There is no cloud
Menu

Leveraging bandwidth throttling with Nutanix DR to NC2

6/19/2025

0 Comments

 
So you want to use Nutanix DR (formerly Leap) to automate DR workloads into NC2 on Azure, but don't want the initial copy to fully saturate your VPN/Expressroute connection?  Well, there's no in-solution user configurable option to set bandwidth throttling (yet) for this product.  (You can set DR traffic bandwidth throttling if you're using PE based protection domains)

There is, however, a way to set bandwidth throttling up via the CLI.  You should open a ticket with support to get confirmation on syntax before implementing these settings.  This documentation is presented for reference purposes.

====== DO FROM SOURCE PE CLUSTER ========
  1. Setup protection policy from cluster to NC2 with one test entity from desired SRC cluster.
  2. Trigger replication of recovery and allow replication to complete
  3. Verify from PE cluster that NC2 remote site is showing: remote_*remote-cluster-id*
  4. Confirm that replication has completed:
    watch -d -n10 ncli pd ls-repl-status protection-domain-type=entity-centric
  5. Create Bandwidth Policy (MegaBytes):
    cerebro_cli add_bandwidth_policy default_bandwidth_limit_new="250"
  6. Note the UUID provided in the bandwidth policy creation output.
  7. Associate the policy with the Remote Site: cerebro_cli modify_remote <Remote_Site_Name> bandwidth_policy_id=<Policy_UUID> bandwidth_policy_enabled=true

Example:
cerebro_cli modify_remote remote_*remote-cluster-id* bandwidth_policy_id=*policy-id-from-step 6*  bandwidth_policy_enabled=true

    8.   Verify Policy shows enabled:
​ncli remote-site list name=<Remote_Site_Name> remote-site-type=entity-centric
0 Comments

Leveraging Nutanix Cloud Clusters on Azure for Citrix DR

4/21/2025

0 Comments

 
Nutanix Cloud Clusters on Azure (NC2) gives you the opportunity to extend or move your Nutanix workloads from on-premise into a public cloud environment.  For our use case, we wanted to pivot DR for a a specific enterprise workload from on-prem into the cloud to avoid the hardware refresh cycle and hosting costs of running the hardware ourselves. 

The goal: eliminate the recurring spend on capital purchases and do DR in the cloud.
So What  Are We Were Trying to Solve?

To put it simply we are trying to reduce cost. Reducing the Ongoing Cost per Month for Co-location Datacenter Expenses is one of our strategic goals.

Renting space, power, and cooling in a co-location data center is expensive. Nutanix Cloud Clusters in Azure can reduce these costs by leveraging Azure's infrastructure.

In addition to reducing our use of a co-location data center we also want to scale back our recurring Capital Purchases for Disaster Recovery Hardware Refreshes

Regular refreshes every three years for 60+ hosts and associated network infrastructure can be costly. By moving to Nutanix Cloud Clusters in Azure, we eliminate a sizable portion of our need for hardware upgrades, as Azure provides dynamic provisioning and scaling.

On the Connectivity Costs front maintaining multiple redundant connections for disaster recovery adds to the expenses. Azure's global network infrastructure can help streamline and reduce these connectivity costs.

By moving our presentation layer disaster recovery to the cloud, we have significantly reduced the physical footprint of your secondary data center.

Azure's hybrid cloud management capabilities paired with Nutanix Cloud Clusters allows for seamless integration and management of on-prem and cloud resources, simplifying operations.

As an Azure consumer, NC2/Azure made a lot of sense for us, and allowed us to configure Citrix presentation layber behavior for DR similarly to how we configured it at our existing DR datacenter.
Picture
Nutanix Cloud Clusters run the core Nutanix HCI stack (including Nutanix AOS, AHV and Prism) on bare metal instances in public clouds – so it looks and behaves just like our on-prem workloads in Nutanix.
Picture
​The beauty in the solution is in it's resiliency in the datacenter, as well as elasticity on demand – we can scale up or down as needed to meet disaster recovery needs all through centralized management plane in the cloud.
Picture
​What we built out in Nutanix Cloud Clusters looks and behaves pretty much the same as our on premise production deployment.  NC2 obfuscates the underlying Azure infrastructure and provides us with the complete Nutanix stack to work with: clusters, Hosts, storage, networks, and virtual machines,   We can control versions and upgrades, ensuring our DR maintains the same interoperability as our on-prem production environment.
Picture
​So what is a Pilot-Light Philosophy?

Let’s starting by understand what a Nutunix Cloud Cluster Pilot Light is. The pilot light is the minimum required number of hosts, which in this case is 3, to deploy the foundation of a cluster.
The pilot-light approach or philosophy involves maintaining a minimal version of your environment running in the cloud, which can be scaled up quickly in the event of a disaster.
This strategy minimizes costs by keeping most resources powered off until needed, while ensuring rapid recovery and scalability.

The Nutanix Sizer tool was used to determine that four 28-node clusters are required to meet the disaster recovery workload demands.
The tool provides precise sizing recommendations based on real-world workload utilization data, ensuring optimal performance and cost-efficiency.

Initially, four 3-node clusters were built to seed the infrastructure. This allows for the setup and configuration of all workload VMs.
Most of the VMs will remain powered off until needed, reducing operational costs while maintaining readiness for rapid scaling.
Picture

​What are our deployment methodologies?

We opted to Customize our deployment instead of allowing Nutanix NC2 to deploy them automatically
By using pre-defined networks in Azure, we were able to ensure our network configurations conformed to our organization's standards for networks, naming conventions, and security policies.
This approach provides greater control over the network setup, allowing for more precise management and adherence to best practices.

To perform these deployments, we chose to use Infrastructure as Code specifically Terraform.
Terraform enables automated deployment of Azure resources using scripts, which helps in maintaining consistency and reducing manual errors.
Terraform scripts can be used to define, preview, and deploy cloud infrastructure, making the deployment process more efficient and scalable.
This includes creating resource groups, virtual networks, and other necessary components.

When deploying Nutanix Cloud Clusters there are two options for deploying the control plane called Prism Central. The first, deploy one Prism Central instance on one cluster and couple any additional clusters built to that instance or the second option deploying a separate instance of Prism Central per cluster. We decided to deploy a Prism Central for each pilot light cluster enhancing resiliency by providing additional isolation of environments.
This approach requires minimal extra provisioning overhead while ensuring that each cluster can be managed independently. Meaning we could lose any one of the clusters without taking down the entire environment.
Picture
We scaled up to full 28 node clusters, both to vet the process, as well as fully build out the Citrix DR environment.  Once the build-out completed, all VMs were powered down, and the cluster was scaled back down to the original 3-node pilot light cluster.

Significant testing was completed during the scale-out phase, including template replication from on-premise into NC2, DNS registration, VM registration with Citrix Director, application launches, Citrix session management, 3rd party application integration, Impravata support, partner application operation, and login times for both non-production AND production end-user workloads.
Picture
Picture
Throughout the deployment and testing process, we worked with Nutanix Support and engineers, as well as Azure support to solve some of our most complicated challenges.  Both organizations put in the time and effort to ensure our projects success.
0 Comments

External iSCSI presented directly to AHV hosted VM's

4/11/2024

0 Comments

 
Sometimes we come across unique, specialized use cases where solutions must be found outside of the box.  This particular use case for me involved industry physical security video recording for hundreds of cameras across many different geographic locations -- with a caveat -- the vendor software can ONLY write to a locally presented disk (no NAS locations, no cloud possibility).  Conditions were also right in the storage sphere where a new large-capacity all flash array came to market with incredible pricing, so it was more attractive than using HCI storage for this solution (we needed ~2PB of storage space).  We had never used iSCSI in this fashion before, so it was a journey of discovery for us.  This is that journey.
Prep work:
1) carve out a dedicated network for the iSCSI traffic and make sure the storage and the VM's can access it.
2) on each VM, add a vNIC to be used exclusively for iSCSI traffix
3) on each VM, modify the registry according to vendor best practices.  In our case that meant modifying two: HKLM TcpAckFrequency and HKLM ​TcpNoDelay.
Configuration & Presentation:
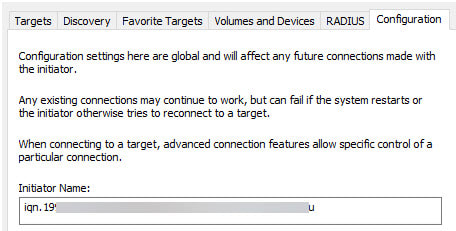
1) Get the IQN from the VM by opening iSCSI initiator
Picture
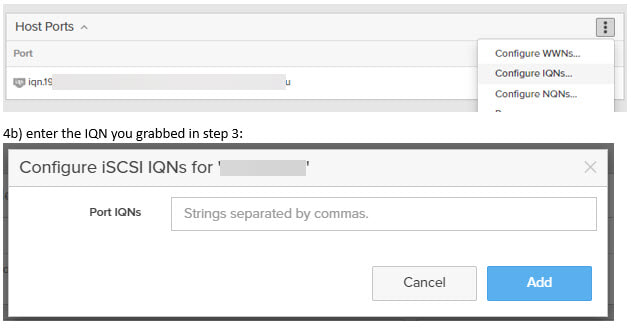
2) Register the VM initiator IQN with the storage array.  Typically you will create a host/VM entry in the storage array, and connect the initiator IQN to it.
Picture
3) On the VM, ) install MPIO if it’s not already installed on the server you are setting up iSCSI on:
https://support.purestorage.com/Solutions/Microsoft_Platform_Guide/Multipath-IO_and_Storage_Settings/Installing_Multipath-IO
​
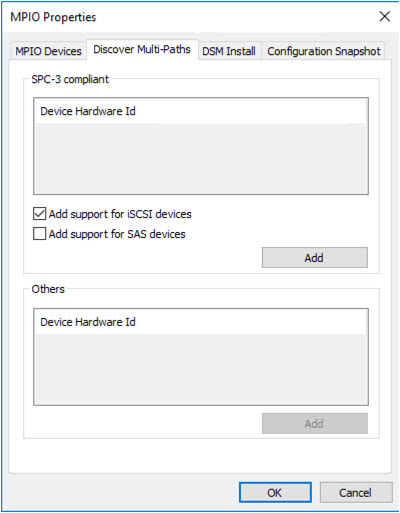
3a) Configure MPIO to mask the iSCSI volumes in Windows Server per the vendor specifications.  This involves inputting a string specific to the vendor into the Device Hardware ID field in the MPIO properties window

3b) ​You need to add iSCSI support on the MPIO Discover Multi-paths tab as well:
Picture
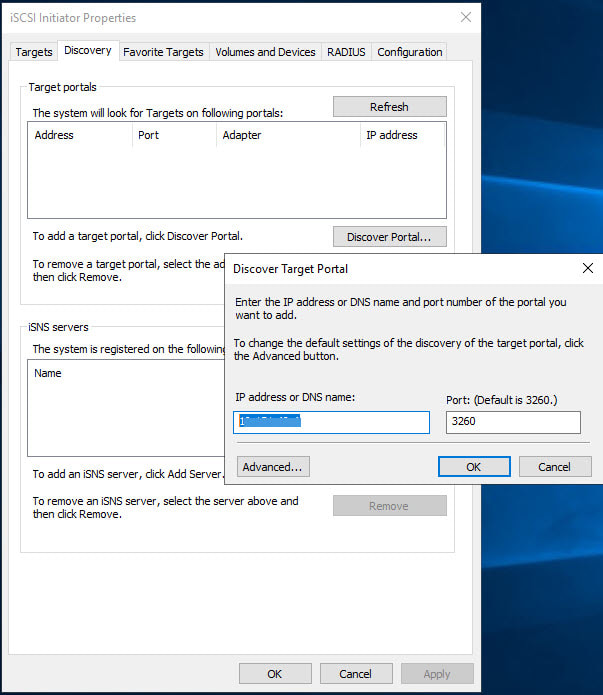
4) Add the iSCSI discovery portals on the VM (server).  In our case, we wanted 8 paths, 4 per controller, so each controller needs to be added to the target portals: 
Picture
5) Go into ISCSI on the VM and connect to the discovered target.  Be sure to enable Multipath.
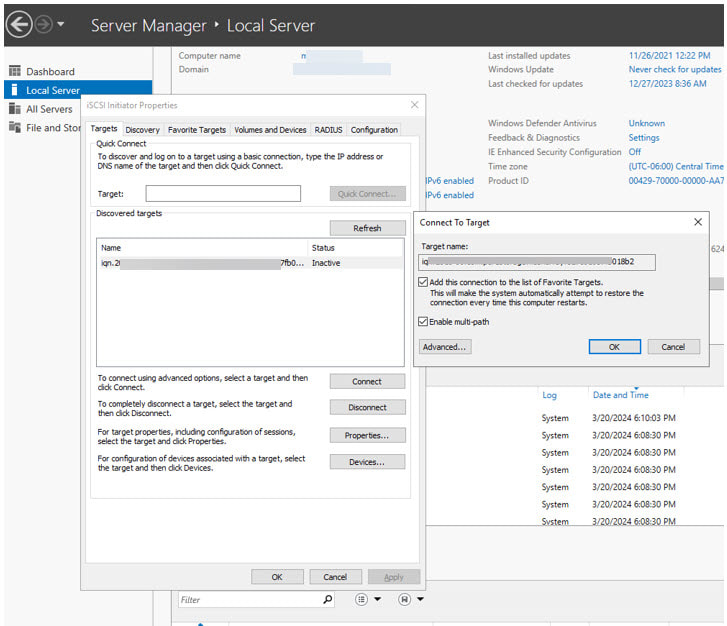
Picture
6) the new disk(s) should now show up in disk management on your VM and can be formatted and used.
0 Comments

Nutanix AHV Cisco ACI Integration as a VMM solution announced!

8/28/2023

0 Comments

 
Great news for those using ACI in their environments, who might be used to ACI having visibility into their virtualized VMWare environments -- this functionality is coming to Nutanix! 

​From Cisco's release notes: "You can now integrate the Nutanix Acropolis Hypervisor (AHV) with Cisco Application Centric Infrastructure (ACI). The Cisco APIC integrates with Nutanix AHV and enhances the network management capabilities. The integration provides virtual and physical network automation and
VM endpoints visibility in Cisco ACI." ​https://www.cisco.com/c/en/us/td/docs/dcn/aci/apic/kb/cisco-aci-nutanix-integration.pdf
You need to be running:
Cisco APIC 
6.0(3) -- (released August 2023) or newer
Nutanix: To use current vSwitches without creating a NEW vSwitch (no vSwitch creation):
  • AOS 6.5
  • Prism Central 2022.6
To be able to create vSwitches
  • AOS 6.6+
  • Prism Central 2022.9+

Benefits of the integration are:
  • visibility into the cluster from the Cisco APIC
  • network statistics collection into APIC
  • support for Cisco EPG's (endpoint groups) to configure networking support on Nutanix
  • support for intra-EPG policies (intra-EPG contract is not supported) 
Picture

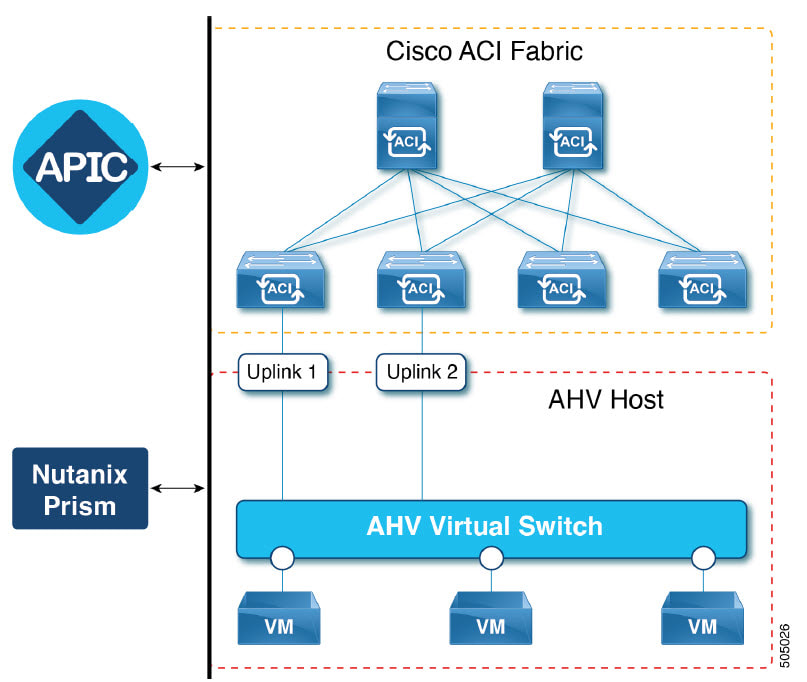
The image above shows a sample topology. The Cisco APIC manages the ACI fabric and policies. The VMs connected to the virtual switch are managed by the Nutanix Prism. ACI fabric provides network connectivity for VMs in AHV Hosts with the uplinks (Uplink1 and 2).

How it works:
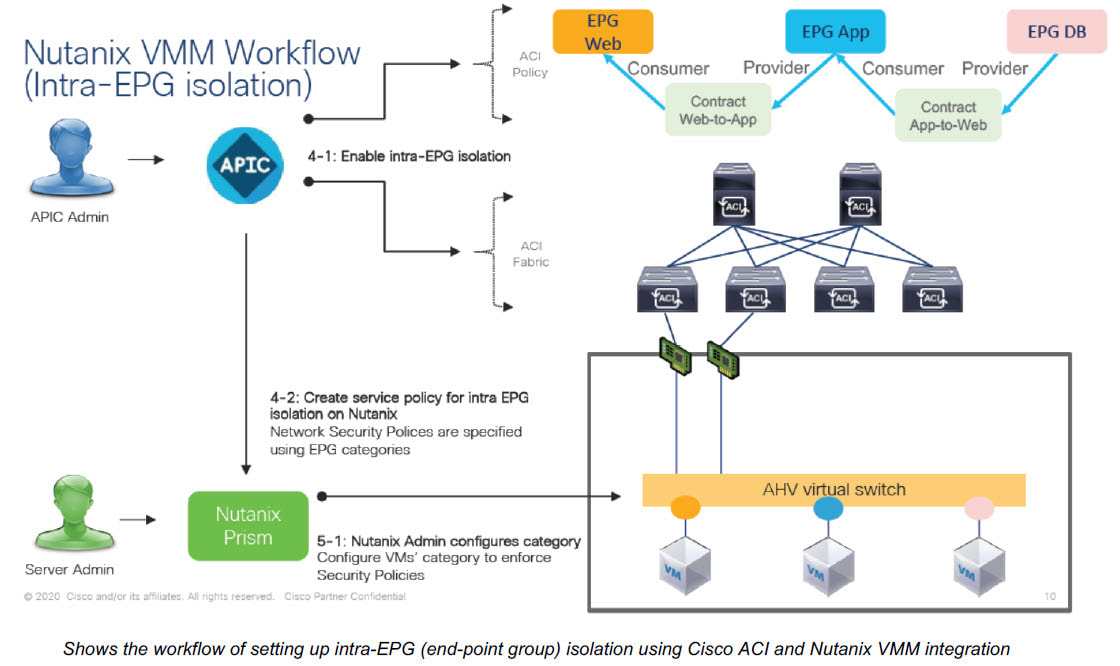
Cisco ACI uses EPGs, or end-point groups, to deliver policy to sets of defined endpoints (i.e. VMs) within
ACI to NCP AHV with Flow Network Security as a VMM solution.
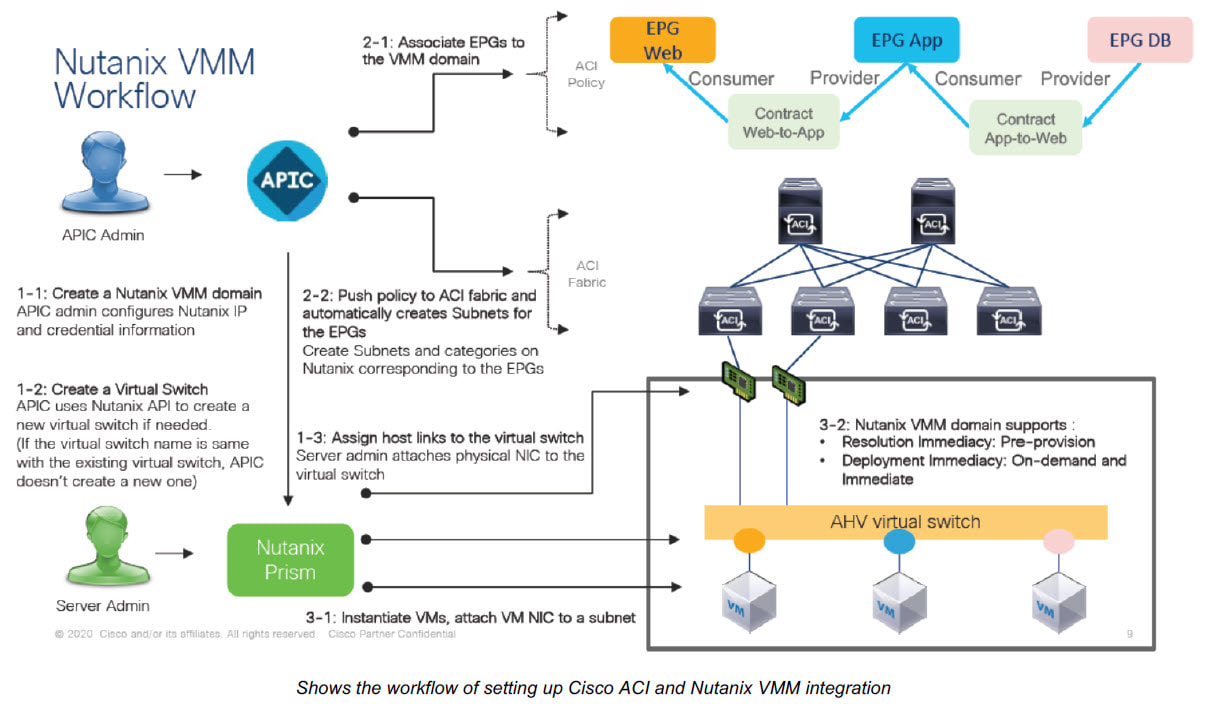
Picture
Picture
Documentation from Cisco here:
Inclusion on Cisco’s ACI VMM solution webpage:
https://www.cisco.com/c/dam/en/us/td/docs/Website/datacenter/aci/virtualization/matrix/virtmatrix.html
. Cisco ACI 6.0.3 release notes mention the new Nutanix integration:
https://www.cisco.com/c/en/us/td/docs/dcn/aci/apic/6x/release-notes/cisco-apic-release-notes-603.html
. Cisco ACI and Nutanix AHV VMM Integration Guide/Tech Note:
https://www.cisco.com/c/en/us/td/docs/dcn/aci/apic/kb/cisco-aci-nutanixintegration.
html?dtid=osscdc000283

0 Comments

My .NEXT 2023 Chicago recap

5/18/2023

0 Comments

 
Picture
Big announcements aplenty at the .NEXT 2023 conference. 
In no particular order:
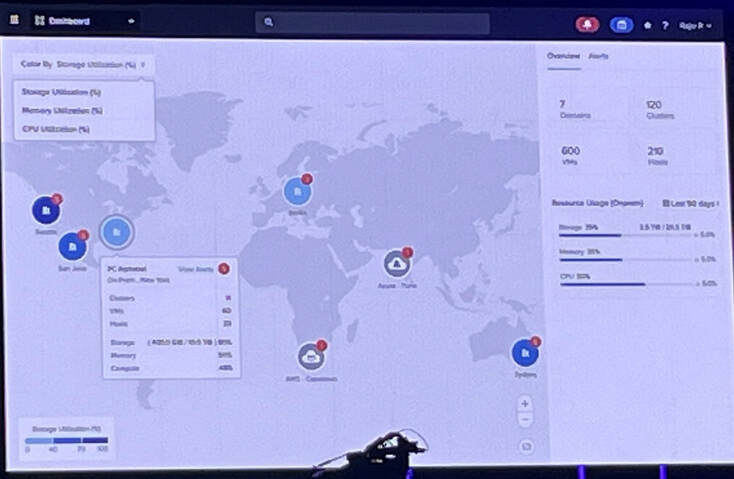
1. Nutanix Central: A SaaS based cloud-delivered solution that will provide a single interface for managing ALL of your Prism Central deployments, whether on-prem, cloud or MSP.  In early-access now(ish) with features set to roll out going forward.
​https://www.nutanix.com/blog/introducing-nutanix-central
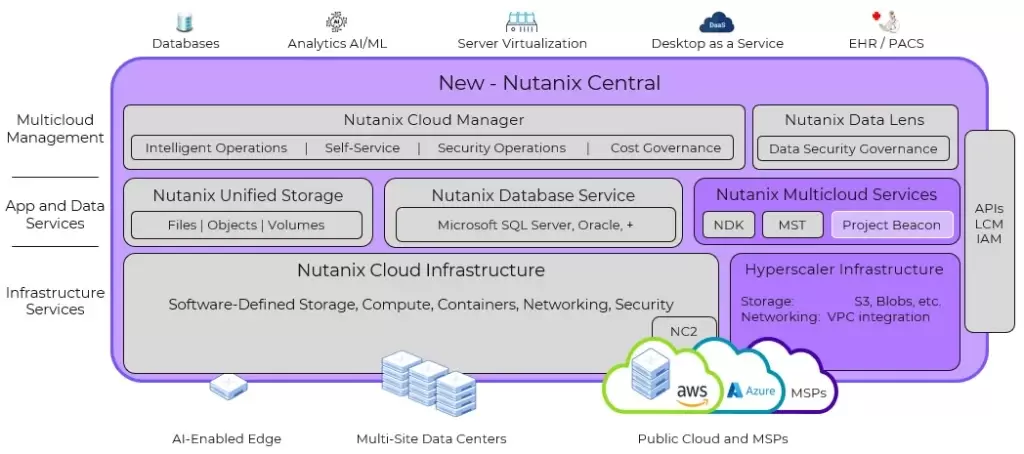
Picture
Picture

2. Multicloud Snapshot Technology (MST)
- This allows snapshots directly to cloud-native datastores in S3.  
  • Ability to protect and migrate stateful Kubernetes applications and data across cloud infrastructures with NDK
  • Disaster recovery and backup for containerized virtualized applications
  • Ability to create a snapshot with instant recovery anywhere
  • Cross-cloud migration
  • Ability to share data for workflows like test/dev, long-term retention for compliance, etc.
https://www.nutanix.com/blog/nutanix-reimagines-business-continuity-for-hybrid-multicloud-users

3. Project Beacon - This initiative takes aim to provide a portfolio of data-centric PaaS services available natively in the cloud.  It's intent is to decouple applications and their data from the underlying infrastructure, giving developers greater flexibility to build applications once and run them across various environments natively on Nutanix or in the public cloud.
https://www.nutanix.com/blog/introducing-project-beacon

4. Nutanix Data Services for Kubernetes (NDK) - in early access.  NDK is designed to deliver enterprise-class storage, snapshots and DR capability to Kubernetes.  
https://www.nutanix.com/blog/nutanix-announces-early-access-of-ndk
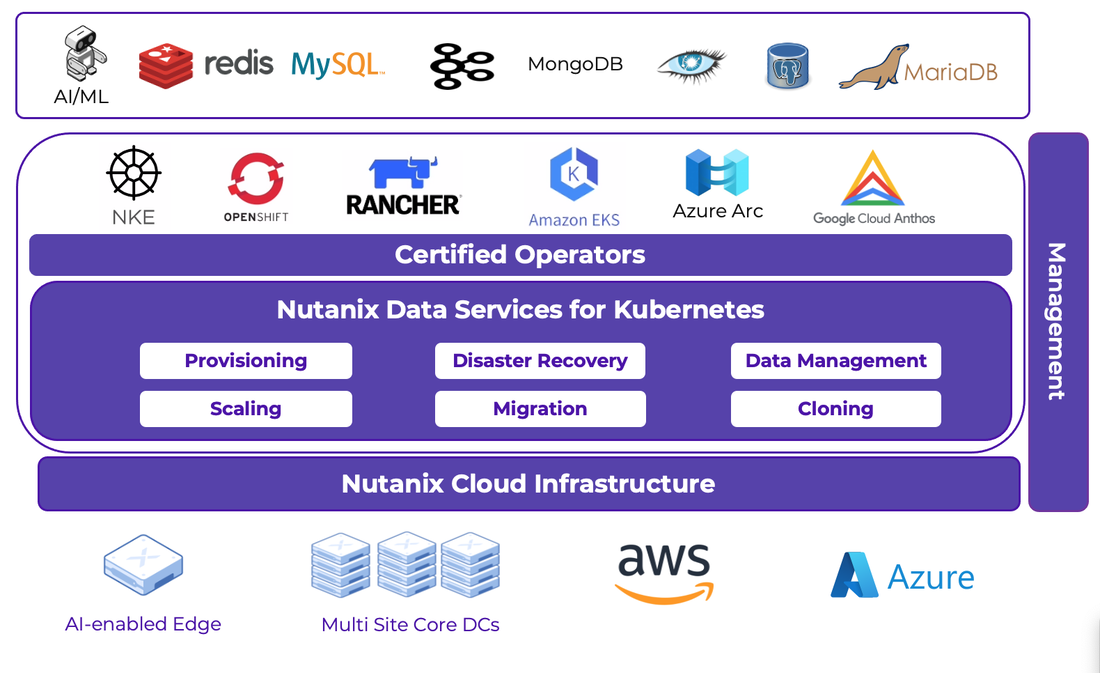
Picture
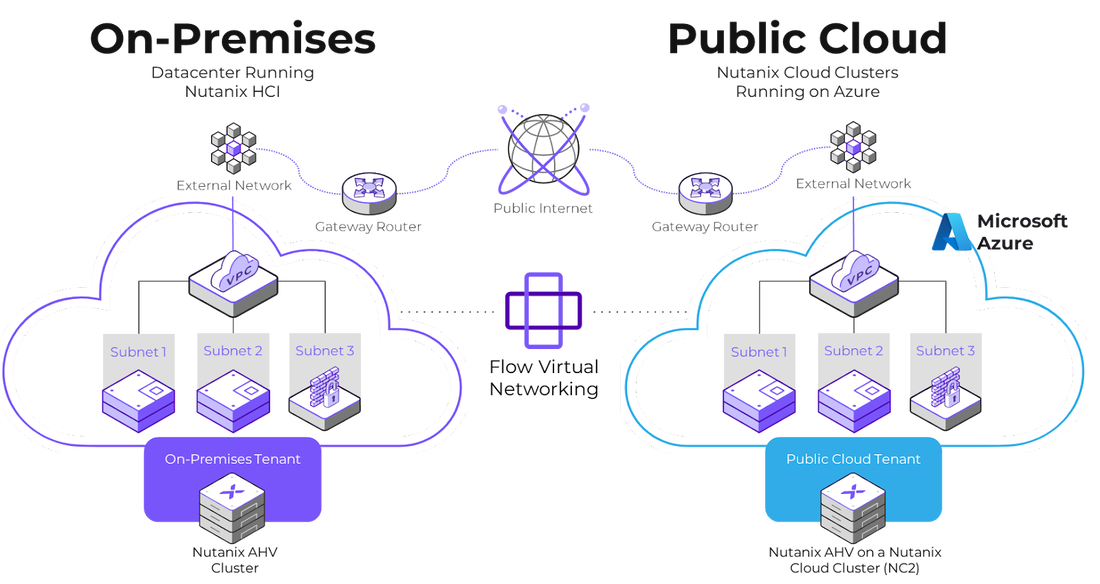
5. NCP enahancements which include the ability to dynamically apply security policies across multiclouds enabling secure, seamless virtual networks using Flow Virtual Networking.  Available now in NC2/Azure, and in development for AWS.

https://www.nutanix.com/blog/dynamic-approach-to-hybrid-multicloud-network-securityNCP 
Picture
It was also a chance to meet up with old friends and make some new ones.  NUG Chapter Champions in attendance met in the Solutions Expo for some hangout time and a group photo:

Picture
Shout out to all the Nutanix Technology Champions in the Day 2 General Session:
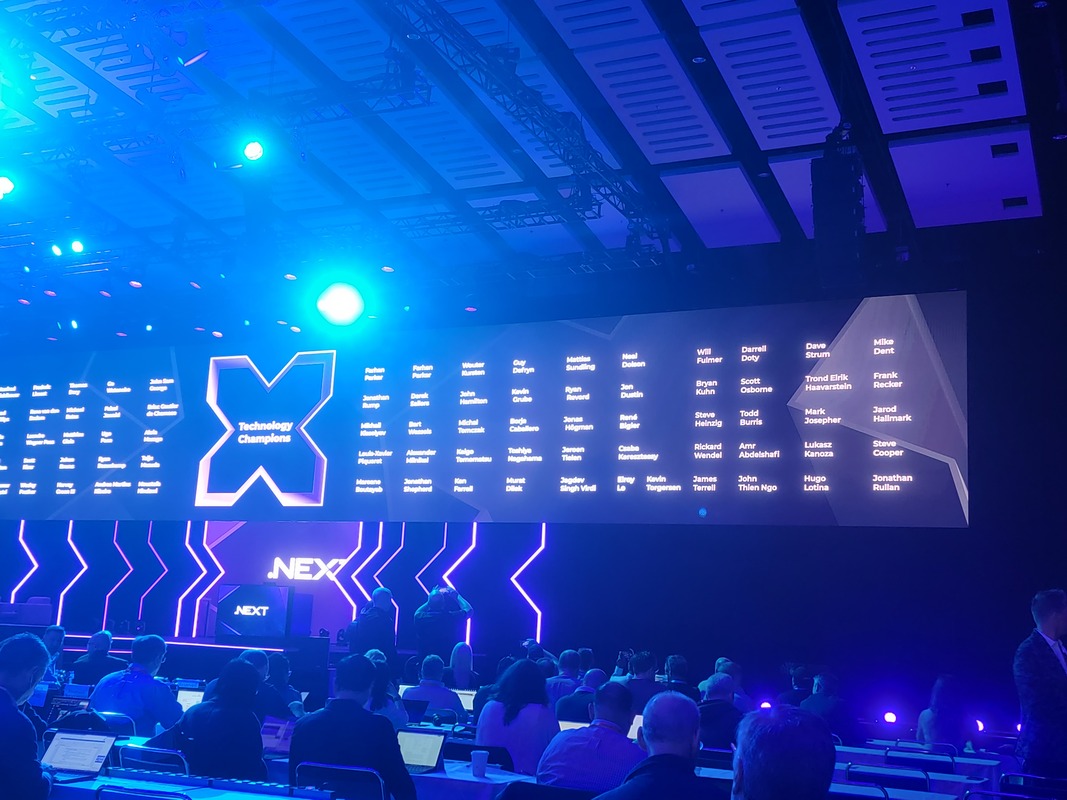
Picture
Great conference, nice venue.  It was nice having the conference so close to home base.  Hope to see everybody in 2024!
0 Comments

Migrating from ESXi-first to AHV-first

5/5/2023

0 Comments

 
History:
We had been running Nutanix successfully for years on the ESXi platform.  We initially landed on ESXi because that's what we were using when we decided to move to HCI-first.  In an effort to streamline operations, lifecycle management, we took a serious look at AHV as an option -- after all, it was included with the Nutanix licenses we were already paying for.  We added an AHV cluster to our test lab and put it through the paces for a few months and then we decided it was ready for primetime, so we kicked off this project.

Our goals: 
  • reduce overhead wherever possible and improve efficiencies
  • remove the extra management task of keeping up with frequent security vulnerabilities on the VMWare platform and having to manage 2 different lifecycle management processes. 
  • reduce our redundant licensing costs for VMWare

Challenges to overcome:
  • Existing backup solution not compatible with AHV (ended up pivoting to Hycu for AHV workloads)
  • Existing BCDR solution not compatible with AHV (ended up selecting Nutanix Leap for AHV workloads)
  • end-user access/rights via Prism Central not like-for-like compared to vSphere.  Our migration took place prior to custom RBAC being available, so we used categories to control what users would see when logged in.
  • end-user training on Prism Central would be needed
  • Some vendor-supplied workloads not certified/approved for AHV, vendor "FUD"  These were simply added to an exemption list for future analysis/migration.

Phase: Planning
  • spreadsheet from all active VM's with identified owners, work through support and migration plans to AHV.
  • Work with vendors, where applicable, to get buy-in to run workloads on AHV vs ESXi
  • Making sure passwords with administrative access were in place was key.  AD connected machines were easy, Linux took some coordinated effort with our Linux team to make sure we could seed the MOVE jobs.  

Phase: Buildout
  • We were lucky enough to have the cluster refresh cycle align with our move plans.  3 new clusters were sized, ordered and deployed.
  • Most of our production workloads were coming from 3 large general-purpose ESXi clusters, which made things easier: we would just move ESX1->AHV1, and so on.  We had a few other special use-case clusters which also needed new AHV target clusters. 
Picture
Phase: Execution & Migration
​
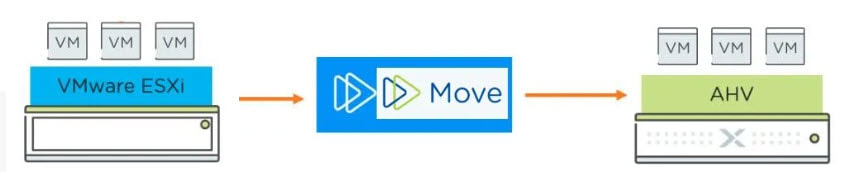
  • We deployed 1 Move appliance VM on each cluster that would have workloads moving between ESXi clusters to AHV clusters.
  • Some more secure platforms required server owner intervention to populate the passwords into the move jobs.
  • Working with the server owners, we scheduled in batches of 10-12 servers to migrate during each of our existing maintenance windows.  This process repeated for months until we hit around the 90% of servers moving, at which point we wrapped up the project.
  • As part of our moves, we added categories to all VM's once they migrated into AHV including backup, owner, server type (from our pre-migration spreadsheet).
​Here are the steps to move virtual machines from ESXi to Nutanix AHV using Nutanix Move:
  1. Download and install Nutanix Move on a server or virtual machine that has network connectivity to both the source ESXi host and the target Nutanix AHV cluster.
  2. Configure Nutanix Move to connect to both the source and target environments (for us the vCenter and the target Prism Element cluster)
  3. Create a migration plan by selecting the virtual machines to be migrated and specifying the migration settings, such as the target cluster and storage container.
  4. Validate the migration plan to ensure that it meets the requirements of the target environment and does not have any errors or warnings.
  5. Start the migration process and monitor the progress of each virtual machine as it is migrated to the target environment.
  6. Verify that the migrated virtual machines are running correctly on the Nutanix AHV cluster.
  7. If necessary, perform post-migration tasks such as updating the virtual machine configuration or modifying the network settings.
Phase: Aftermath
  • Remaining VMs on ESXi are being retired & replaced on AHV as they retire if supported.
  • Virtually all new builds are now taking place on AHV. 
  • Continue to work with vendors on ability to deploy into AHV as needed.
0 Comments

Do you manage a datacenter?

5/4/2023

0 Comments

 
Picture
openDCIM is a free, open-source data center infrastructure management (DCIM) software that allows you to manage your physical data center infrastructure. It is designed to be easy to use and flexible enough to handle a variety of data center needs, from small server rooms to large enterprise data centers
With openDCIM, you can manage and track a variety of physical assets in your data center, including servers, switches, power distribution units (PDUs), and more. The software provides a web-based user interface for managing your data center infrastructure and includes features such as:
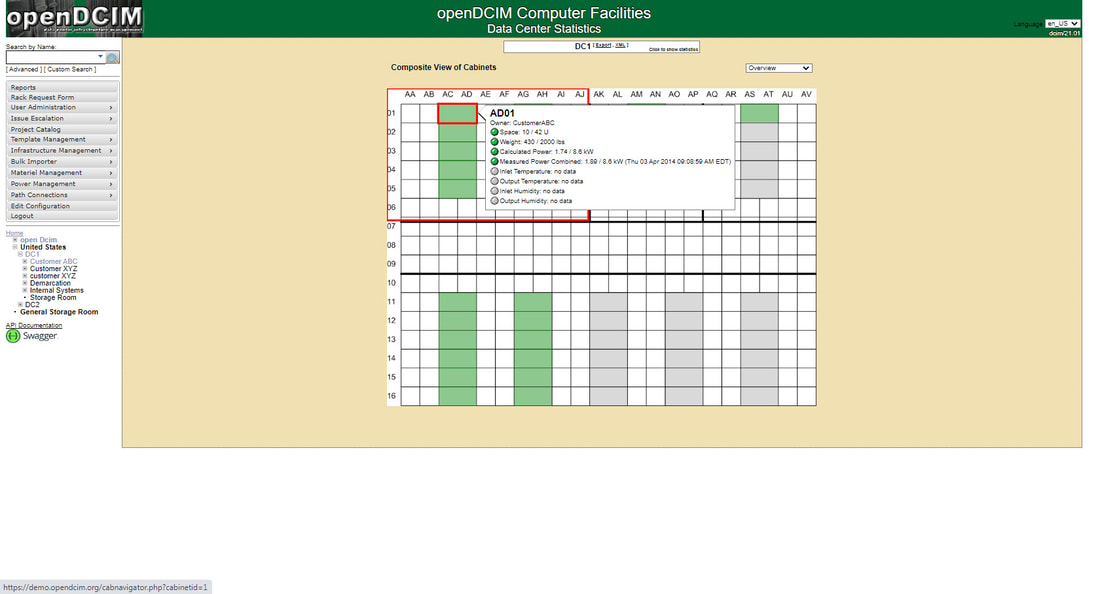
  • Asset tracking: Easily track the location and status of all your data center assets, including servers, networking equipment, and power distribution units.
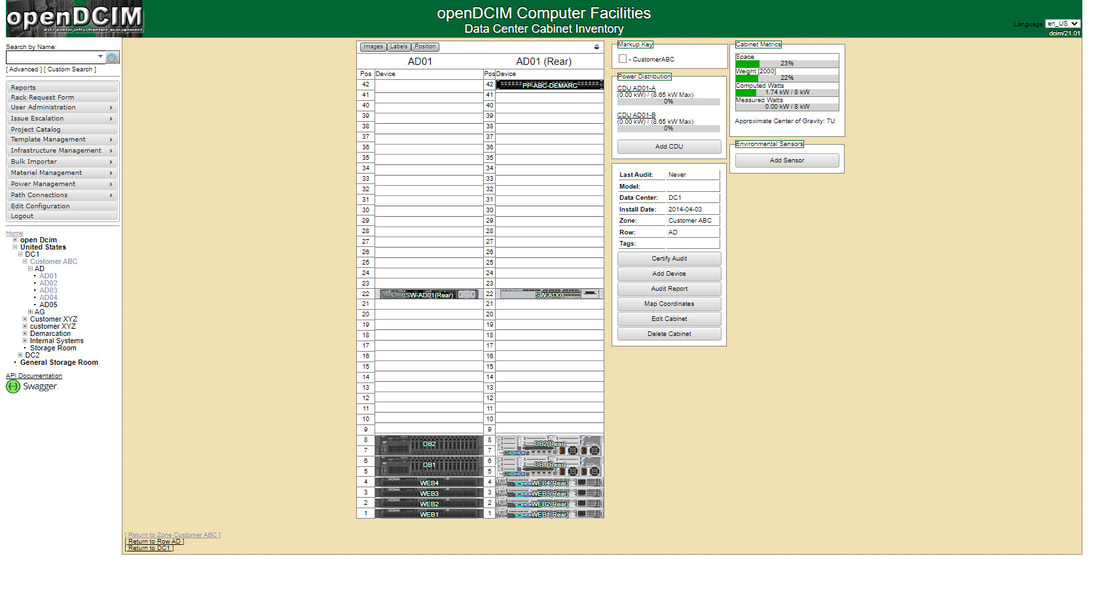
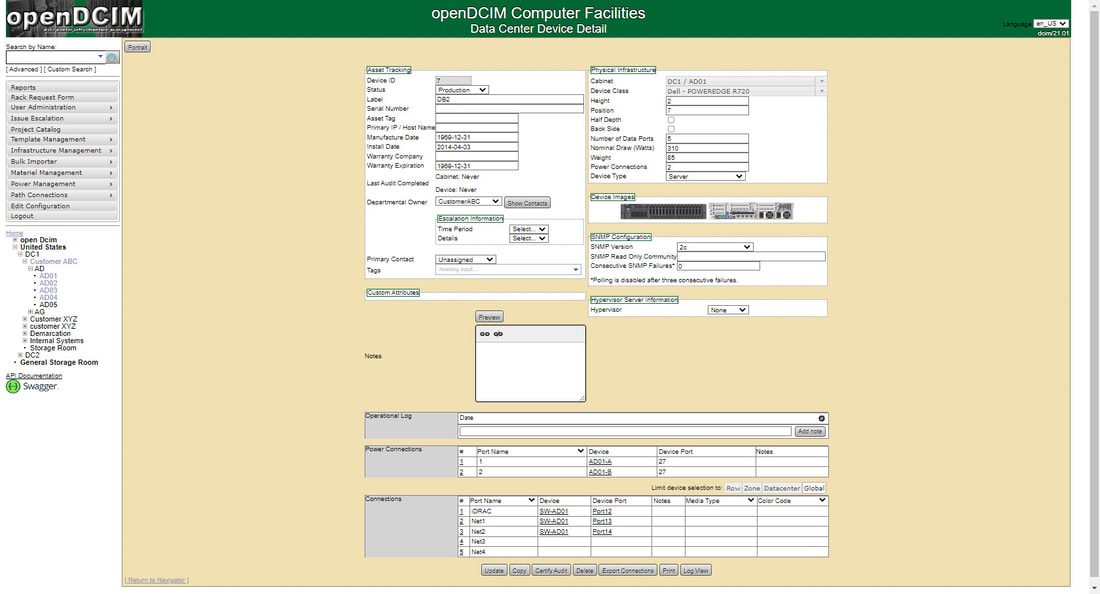
  • Visualization: OpenDCIM allows you to visually map out your data center, including racks, power distribution, and network connectivity.
  • Capacity planning: With openDCIM, you can plan and optimize your data center capacity by visualizing your available space and power.
  • Power management: The software provides real-time monitoring and management of power consumption and distribution.
  • Reporting: OpenDCIM provides customizable reports and dashboards to help you track and analyze your data center infrastructure.
Picture
Picture
Picture
openDCIM is highly customizable, allowing you to customize it to meet your specific data center needs.  A few customizable options:
  • User-defined fields: OpenDCIM allows you to add custom fields to your assets and locations, which can be used to store additional information beyond what is provided in the default fields.
  • Custom templates: You can create custom templates for asset types, which allows you to define the fields and information that are tracked for each type of asset.
  • API integration: OpenDCIM includes an API that allows you to integrate with other systems and tools, such as monitoring and automation software.
  • Custom plugins: You can create custom plugins for openDCIM to extend its functionality and add new features.
  • Localization: OpenDCIM supports multiple languages and can be localized to meet the needs of different regions and languages.
Overall, openDCIM provides a high degree of flexibility and customization, allowing you to tailor the software to meet the unique requirements of your data center.
You can take it for a test drive here: opendcim.org
You can download openDCIM here: opendcim.org/downloads.html

They have a wiki for additional information: wiki.opendcim.org/wiki/index.php/Main_Page
0 Comments

Converting an entire Citrix & VDI platform from ESXi to AHV... in 30 days.

4/12/2023

0 Comments

 
The goal: move an entire production Citrix & VDI platform from ESXi to AHV.  Below is our before (left) and after (right)
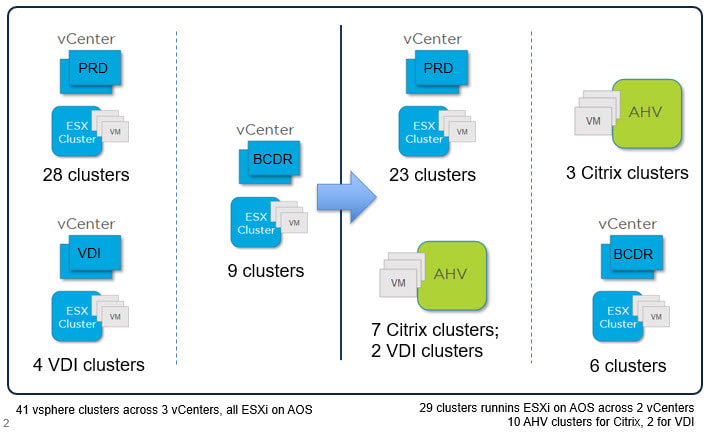
Picture
What is delivered:
•EMR sessions daily: 10000+
•VDI sessions daily: 4800+ 
•delivers 900+ general apps
•13000+ Citrix users
What makes it up:
•Published Apps (1155 servers)​
•Infrastructure (69 Server)​
•primary data center hosts- 110​
•secondary data center hosts- 72
The POC
  • First thing we needed to do was a pilot POC.  To accomplish this we initially build a 4-node AHV test cluster running a variety of AHV & test workloads.
  • We had a few hundred users running a variety of non-prod apps, the Citrix team used this cluster to iron out wrinkles in the Citrix deployment process.
  • Worked through “power-on” actions in our images (the way VMWare and Nutanix handle VM power reset options differs, so the images had to be changed to honor the AHV power action)
  • Worked through tweaking Cisco ACI/EPG configs (because ACI has a plugin for VMWare, but not Nutanix, there was a minor tweak in our config needed for AHV)
Cluster sizing
  • Citrix: On ESXi, our default cluster size had been 24 nodes, but this led to LCM patching process being quite lengthy.  We decided to modify this to 12 node clusters for this deployment, both to decrease the failure domain and for manageability for upgrades.
  • VDI: since we have 2 different flavors of VDI (server-based and client-based) we decided on 2 different 24 node VDI clusters for the solution.
Workload & support challenges
  • EMR golden images from VMWare would not work in AHV.  Worked w/ Nutanix Support, but couldn't get them working.  These had to be recreated from scratch, and that worked.
  • Our backup solution does not work with AHV, so we had to set up DR Sync to back up our images.
  • During migrations - we were seeing higher than expected exception rates in the EMR, which required working with the vendor & Nutanix engineering -- eventually solved by forcing memory locality for the VM's on each host w/ vNUMA commands (not available in the GUI)  1-shot fix, once it's set on the host, it's done.  This is slated to be fixed in a future release.
  • iTLB multihit – we disabled this flag– due to performance impacts of the mitigation code (similar to VMWare’s handling of the issue).
The Citrix migration
  1. Drain old ESXi cluster
  2. Convert 3 hosts to initially seed the new AHV cluster
  3. Foundationed the remainder of the hosts and added them to the AHV clusters
  4. Redeploy Citrix servers (power off on ESXi, redeploy on AHV via Citrix)
Entire process was done in less than a month
​
The VDI migration
  1. Created initial 3-node AHV seed cluster
  2. conversion process for personal/persistent VDI’s - used Nutanix Move to migrate those VDI's from ESXi->AHV.  Moved 200+ VDI's that way with minimal errors.
  3. Also used Move to migrate VM templates to AHV.
The migration was fairly painless and we actually saw improved density on the clusters running AHV instead of ESXi on top of AOS -- about a 10% improvement.  The transition for our Citrix support staff was seamless.

The success of this project paved the way for our next project; converting our general production workloads from ESXi to AHV.
0 Comments

when vCenter boots into emergency mode

4/11/2023

0 Comments

 
Picture
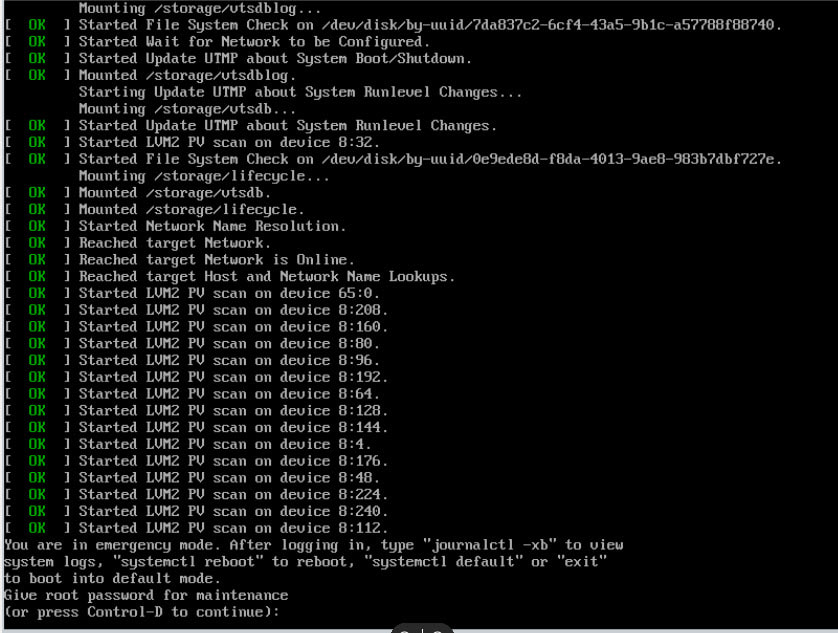
"Entering emergency mode. Exit the shell to continue."

There's already a VMWare KB article about this: ​"Failed to start file system check on /dev/disk..." error on Photon OS based virtual appliances (2149838) but in our case this did not resolve the issue.

What we did to fix the issue:
Restarted vCenter appliance and entered GRUB menu.
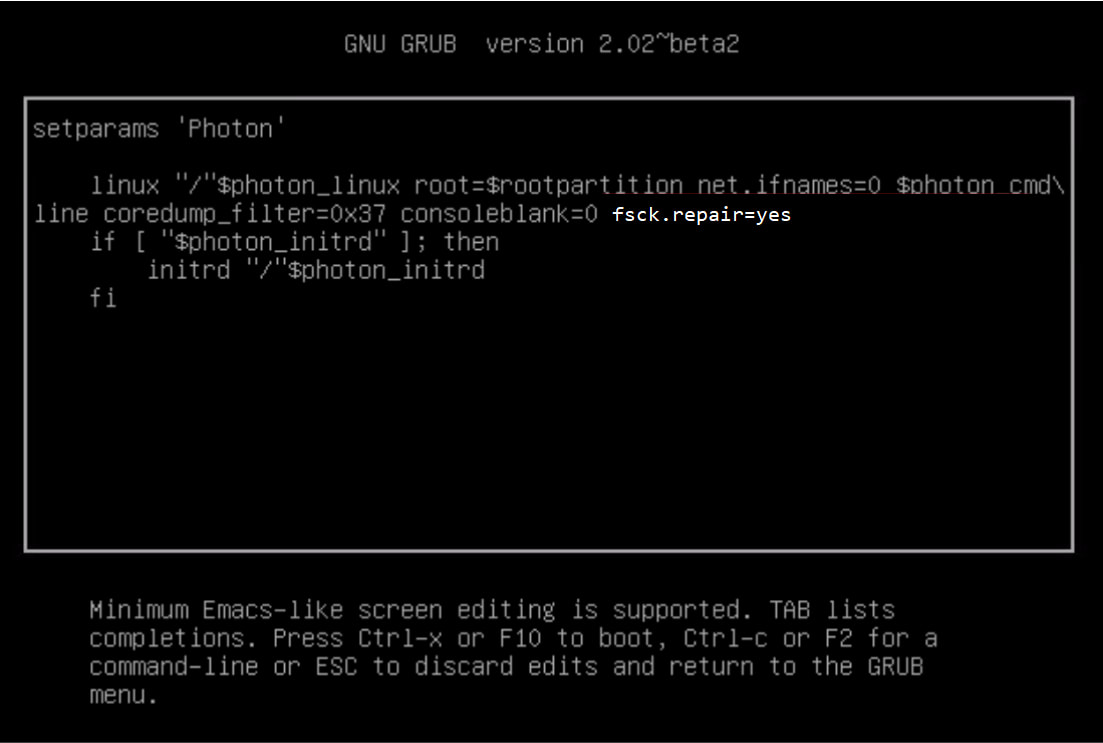
Picture
Added "fsck.repair=yes" after "consoleblank=0" and booted.

All vCenter services started and were working as expected.
0 Comments

    Chad Dorr

    Engineering cloud, infrastructure, storage & virtualization solutions for 16+ years.

    Archives

    August 2023
    May 2023
    April 2023

    Categories

    All
    AHV
    Cisco ACI
    Datacenter Management
    Infrastructure Management
    Move
    .NEXT
    Nutanix
    VCenter
    VMWare
    VTax

    RSS Feed

Powered by Create your own unique website with customizable templates.
  • Blog
  • Contact
  • Blog
  • Contact